Video Optimization
Read the following directions to help you with optimizing and uploading your videos to the SAA website.
Proper video optimization can make a huge difference when trying to upload your video to the Suzuki Association. Often uploading very large videos can be a very time consuming process, and with more and more phones being able to record in 1080p and 4k resolutions the issues can be magnified by these large files. Even if your video file is under the maximum upload size, if your video is very large you can still have upload fail warnings, because of possible disruptions between your computer and the SAA website.
To ensure that you have an optimized video file use the instructions below, and download a free utility called Handbrake. This free video utility works on Windows, Macintosh, and Linux.
If you are processing a video from a DVD, see instructions below.
If you need to rotate your video, click here.
Video Optimization Instructions
This tutorial is for Handbrake version 1.1.2 as of 12/18/2018. Newer version of the program might have slight variations of these instructions, and you can refer to the Handbrake documentation for further help.
- Download Handbrake (https://handbrake.fr/) and Install on your computer.
(if you don’t already have it installed) - Open the Handbrake application.
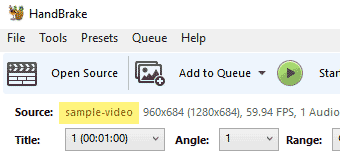
- In the top left corner click (Open Source). A drop down menu will appear and select (Open File).

- You will see the name of the file you selected in the upper left corner, and the length of your video below that.
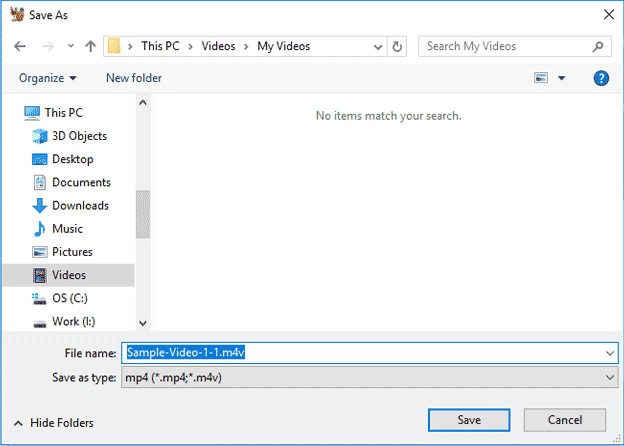
- Click the (Browse) button next to the (Save As) box.
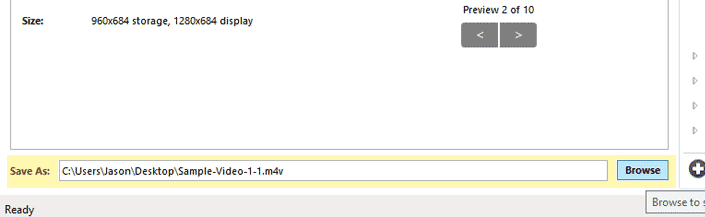
- When the file save window opens. Type in a name for the new optimized file. Navigate to a folder where you can find the file. (Desktop) or (Videos) folder is a good choice.
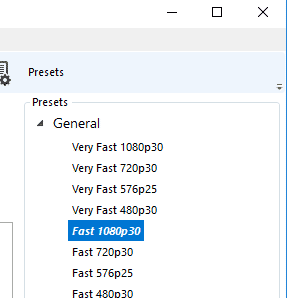
- From the (Presets) menu click the (Fast 1080p 30) preset.
- Then make sure (Anamorphic) setting in the (Dimentions) tab is set to (Automatic).
Note: This setting might also be in the (Video or Picture) tab and might be labeled as (Strict), depending on your version of Handbrake.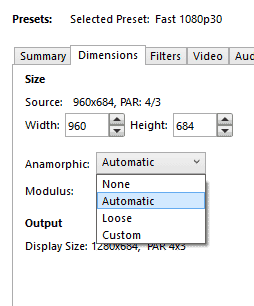
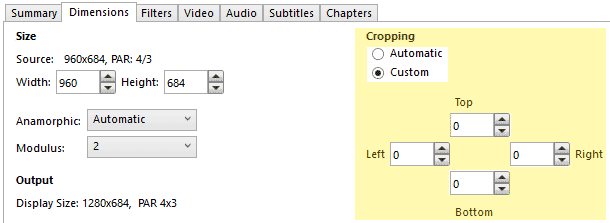
- Also make sure all the (Crop) numbers are set to 0 (Top, Left, Right, Bottom), also in the (Picture) tab or (Video) tab.
- Switch to the (Video) tab and change the (Constant Quality) setting to 20.
Note: This setting impacts the file size more then any other, so if your video is still too large you can set this setting between 20-25 instead.
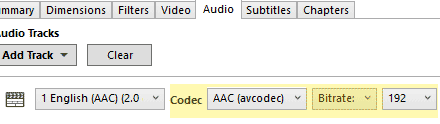
- Last setting is in the (Audio) tab. Change the (Codec) to (AAC (avcodec)) or (AAC (ffmpeg)), and the Bitrate to 192.
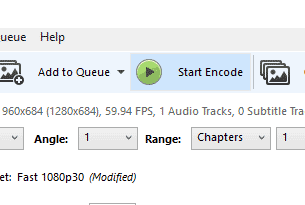
- Click (Start Encode) in the top bar, and your video will start processing.
- Wait for your video to complete. While the video is processing the (Start) button will turn into a (Stop) button, and you will see the (Progress Bar) in the bottom on the Handbrake window.
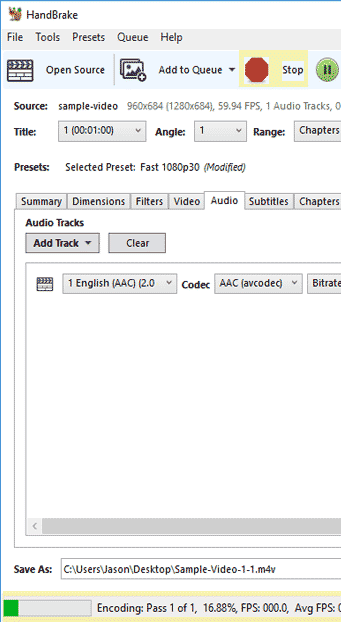
- Once handbrake has processed the video. You now have a new optimized video file in the folder that you selected.
- Please review your video and make sure the sound and content looks good. Remember: If you are auditioning this is the content that you will be evaluated on so make sure it looks and sounds good.
- Upload that new file to the SAA website.
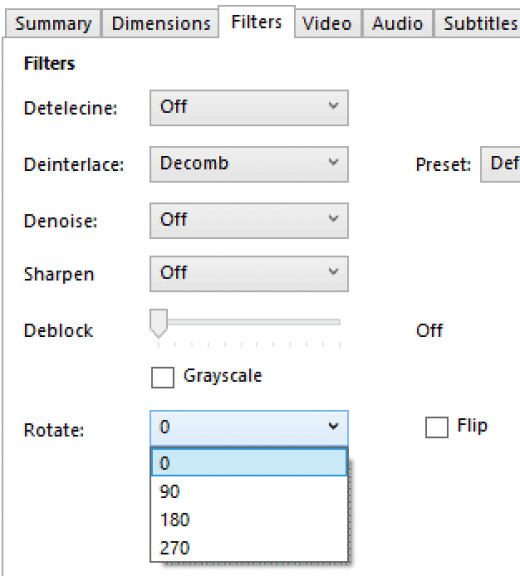
Rotating Videos in Handbrake
Version 1.1.2:
Rotating and flipping a video is now available under the filters tab:
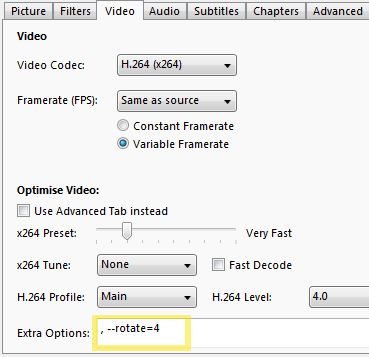
Previous Versions:
If your video is not rotated correctly, you can use one of the following lines of text in the (Video) tab (Extra Options) to correct the issue.
Note: Be sure to include the comma at the beginning of the text.
| Text to Enter | Result |
|---|---|
| , -–rotate=4 | Rotate 90° Clockwise |
| , -–rotate=7 | Rotate 90° Counterclockwise |
| , -–rotate=3 | Rotate 180° |
Video DVD Optimization Instructions
- Download Handbrake (https://handbrake.fr/) and Install on your computer.
(if you don’t already have it installed) - Open the Handbrake application.
- In the top left corner click (Open Source). A drop down menu will appear and select (Open DVD).
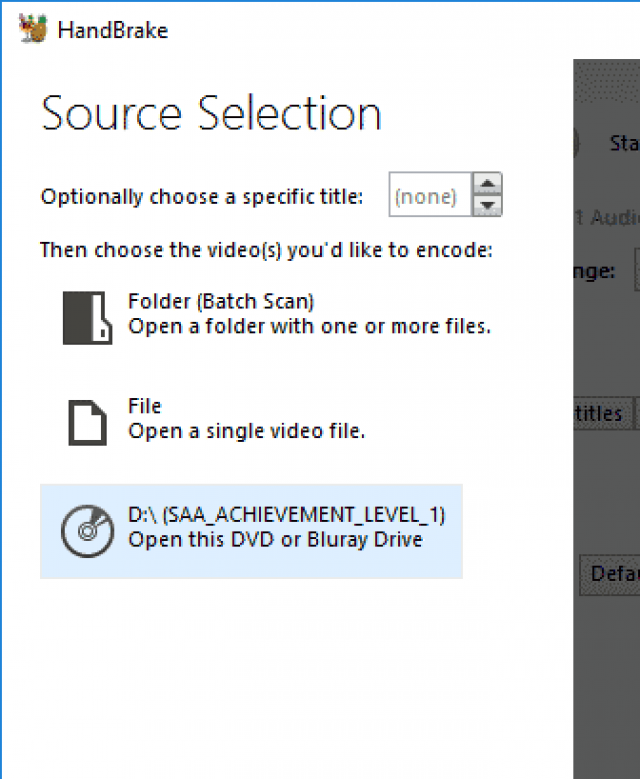
- Handbrake will scan the DVD for the titles and chapters on the DVD.
- Select the title on the DVD that you want to process.
Note: There maybe more then one (Title) on a DVD, and these (Titles) relate to the different videos on that DVD. Think of a DVD that has a main feature then bonus content, and you can select the one of those extra videos that were included. You can see the video length to the right of the title.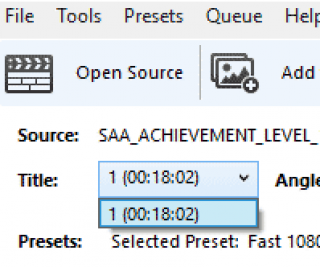
- Click the (Browse) button next to the (Destination File) box.
- When the file save window opens. Type in a name for the new optimized file. Navigate to a folder where you can find the file. (Desktop) or (Videos) folder is a good choice.
- From the (Presets) menu click the (Fast 1080p 30) preset.
- Then make sure (Anamorphic) setting in the (Dimentions) tab is set to (Automatic).
Note: This setting might also be in the (Video or Picture) tab and might be labeled as (Strict), depending on your version of Handbrake. - Also make sure all the (Crop) numbers are set to 0 (Top, Left, Right, Bottom), also in the (Picture) tab or (Video) tab.
- Switch to the (Video) tab and change the (Constant Quality) setting to 25.
Note: This setting impacts the file size more then any other, so if your video looks off after processing you could set this between 20-25 instead. - Last setting is in the (Audio) tab. Change the (Codec) to (AAC (avcodec)) or (AAC (ffmpeg)), and the Bitrate to 192.
- Click (Start) in the top bar, and your video will start processing.
- Wait for your video to complete. While the video is processing the (Start Encode) button will turn into a (Stop) button, and you will see the (Progress Bar) in the bottom on the Handbrake window.
- Once handbrake has processed the video. You now have a new optimized video file in the folder that you selected.
- Please review your video and make sure the sound and content looks good. Remember: If you are auditioning this is the content that you will be evaluated on so make sure it looks and sounds good.
- Upload that new file to the SAA website.
If you are still having trouble uploading your video, please contact the SAA.