Mirroring the Balance of Nature
By Joseph Kaminsky

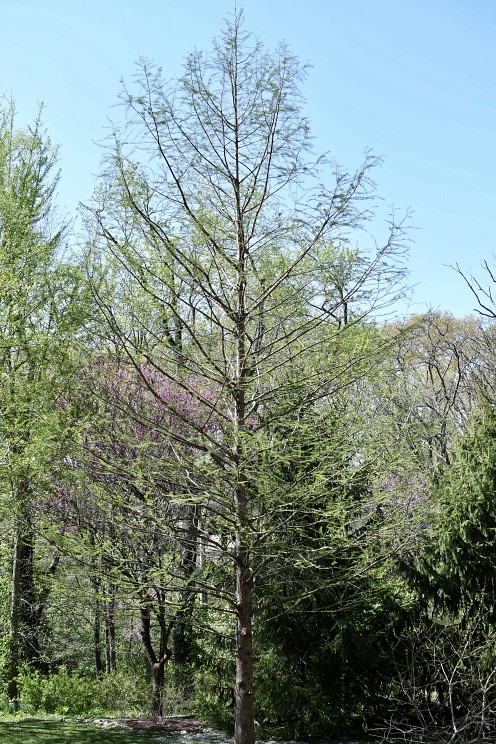
My wife and I love our home in the Midwest. Our backyard overlooks a small pond with a beautiful cypress tree towering over it. I face the window when I teach sporadic Zoom lessons, looking out at the turtle doves, cardinals, squirrels, and even deer that come to drink in our pond. When we experience intense storms, I often gaze upon our backyard, impressed by how that cypress tree handles the intense wind. Rather than fight it, the cypress bends and flexes, rarely losing branches even when the wind hits 50 miles-per-hour. With its ballerina-like gyrations, that cypress tree personifies balance.
In my teaching, I visualize my students as that cypress tree. Balance is as crucial for the cypress to thrive as it is for my students’ bodies if they want to play well. My students even look like the cypress tree with their instruments in hand. Their bodies look like the tree trunk. The left side of their bodies branch out with their violin and left arm extended. Their right arm branches out, too, and sways back and forth as tree branches sway in the wind.
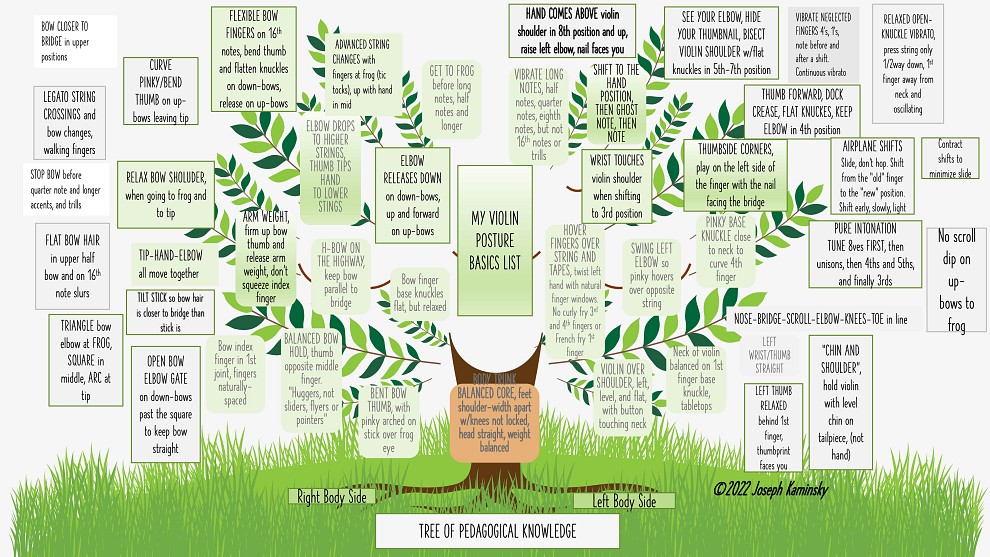
I have designed a “Posture Basics Tree” for my studio that lists some of the most common elements of playing the violin or viola that need attention from my students. Almost all these elements deal with balance, and they are all interconnected, although I didn’t see this interconnectedness when I first started teaching. For instance, if there are problems with the body/trunk balance, it certainly affects the rest of the tree. For each student, I place pink highlight tape “apples” in their “Posture Basics Tree,” numbered in order of importance to each student. When my students play review pieces, Tonalization, and bow exercises, they have their “Posture Basics Tree” out and focus on their personalized apples.
Keeping my students’ playing healthy by having them focus on their “apples” works. They practice a few review pieces or maintenance techniques each day, preferably at the beginning or middle of their practice. “Some apples each day keep your posture at bay!” I tell them. I’ve realized that it’s important to address more fundamental issues closer to the ground before dealing with more specific “treetop” issues. When a bad habit transforms into a good one, the lower “apple” can be harvested, creating space to concentrate on a higher one!
Here are a few examples of “apples” on my “Posture Basics Tree”:

Core balance
{media:47304:med:r:false}
Balanced core: An adequate base is necessary to support body balance. A student’s feet should be shoulder-width apart. The right foot can be slightly behind the left foot. Knees should not be locked, nor bent excessively. The body should be free to move slightly in the direction of the bow on long bows. The student’s head should remain straight, not tilting to their right. I’ve noticed that students whose feet are too close or whose knees are locked do not use enough bow.
Left bodyside
Violin over shoulder: The violin should be enough over the shoulder that the button touches the student’s neck. The scroll should be level with the floor. If the violin is not far enough to the left, the instrument won’t stay level. If it is too far to the left, the bow won’t be straight at the tip—sometimes, the student won’t even be able to get to the tip of the bow. A wide, flexible shoulder pad is instrumental in facilitating this balance.
Left thumb relaxed: The left thumb should be a passive observer. A student should never hold the violin up by clutching the thumb. They should not stop a shift by squeezing the thumb. A clutching thumb is an indicator of how the violin is balanced.
Chin and shoulder: A properly supported violin should be easily held up with the relaxed left shoulder and the natural weight of the head. The student’s head should be straight, and their chin should be on the tailpiece. It’s easy to test if the instrument is supported with only chin and shoulder: just have the student drop their left arm to their side. The scroll should not droop, and the head should not clamp down.
Left wrist and thumb straight: A collapsed wrist indicates that the violin is not balanced properly with the chin and shoulder. It will also pinch the tendons and create tension, slowing down the fingers. It’s hard for students to tell if their wrist is straight since the violin’s neck obscures their view. But the student can easily see if their left thumb is straight. If it is, the wrist will most likely be straight. A collapsed wrist will also tend to produce flat third and fourth fingers as they won’t be able to reach as far.
Swing left elbow so pinky hovers over the opposite string: The left elbow needs to swing under the opposite string to get the fingers over to the string being played. For example, the left elbow must be under the E string to play on the G string. The only exception is that to play on the E string, the left elbow should stay under the D string and not go under the G string because it pulls the elbow too far off balance.
Wrist touches violin shoulder in third position: Stop the shift to third position with the wrist lightly touching the violin shoulder. This technique improves shifting accuracy and reduces the need for excessive repetition to get a shift in tune. Never stop a shift by squeezing the left thumb.
Shift to the hand position: The first thing to know when you travel is where you are headed. The same goes for shifts. Know what position you are shifting to in advance and mark it in your music. Then shift to the proper hand shape for that position. Always keep the pinky hovering over the string when shifting. Shift from the old finger to the new position. Whatever note the old finger would be playing in the new position is called the ghost note. Practice first with light ghost notes, then make them disappear.
See your elbow in fifth position: To reach the fifth through seventh position notes on the violin, students have to move their elbows to the right so they are no longer under the violin. Move the big muscles first by getting the elbow moving before the shift, then bring the left thumbnail under the violin neck. The hand should cover about half of the violin shoulder, bisecting the shoulder.
Hand comes above: The fingers can’t reach high enough when playing in eighth position and up unless the left hand comes above the violin upper bout. The left thumb should stay on the saddle of the violin if possible. If this is not possible due to hand size, keep the thumb in contact with the side of the fingerboard in the high positions, not the violin shoulder. One way to get the hand above the violin is to raise the left elbow for the highest shifts.
Right bodyside
Bent bow thumb: Keeping the bow thumb bent is the “glue” that holds together the entire bow hold. A bent thumb is necessary to counterbalance the release of natural arm weight. It should be bent like a firm banana. A straight thumb produces a mushy sound like a mushy banana.
Balanced bow hold: The bow thumb and middle finger should make a circle. This shape usually results in the ring fingernail being just in front of the frog’s eye. The student should balance the bow hold from the center first. The two middle fingers should not slide forward, stick out straight, or lift off the frog.
Bow index finger in first joint: A center-balanced bow hold will result in the bow index finger’s first joint resting across the bow stick. A center-balance bow hold uses the release of natural arm weight as a primary method for tone production, not excessive index finger pressure. If a bow index finger wraps around the bow so much that the middle joint continuously rests upon the stick, the bow hold is no longer center-balanced. This could also be a sign that the bow is too long for the student.

Open bow elbow gate: A functional bow arm will swing open from the elbow, not the shoulder. Getting this gate to open will keep the bow straight in the upper half of the bow.
Triangle bow arm at frog: Although every student is physically different, a general rule of thumb is to look for a triangle-shaped bow arm at the frog, a square-shaped bow arm in the middle, and an arc-shaped bow arm at the tip.
H-bow on the highway: The bow must always be parallel to the bridge. This way, the bridge and bow hair form the two sides of the H, and the string forms the bar in between. H stands for “Happy.” Avoid A bows and V bows.
Arm weight: Training a student to trust the release of their natural arm weight is so important. Arm weight is more powerful than index finger pressure and more relaxed than squeezing the bow down. Dr. Suzuki’s “Circle Training” is the first step to cultivate this.
Tip, hand, and elbow all move together: For basic bowing and string crossings, the tip of the bow, the bow hand, and the bow elbow all move together. Bow exercises are a great way to train the arm to do this.
Relaxed bow shoulder: Some students develop the bad habit of raising their right shoulder when they go to the frog. Instead of moving straight up, the upper bow arm should move forward as they go to the frog. Some students also raise their right shoulder as they extend to the tip of their bow. If they can’t reach the tip without raising their bow shoulder, students should avoid the tip altogether or even get a smaller bow. On the opposite end of the spectrum, some students hunch their right shoulder because the left shoulder hunches. This is a sign to check that they’re using an adequate shoulder pad.
Elbow drops to a higher string: Students should lead string crossings by dropping their elbow to the higher string. For lower strings, students should have the bow thumb tip the hand up to the lower string.
Curve pinky and bend thumb on up bows upon leaving tip: Try as we might, it’s hard to keep the bow thumb bent and the pinky arched at the tip of the bow. As we extend our arms, our fingers might slightly straighten. Students with shorter arms have more trouble with this. If this happens, make it a habit for students to bend their bow thumb more and arch the pinky more on the up bows as soon as the bow has left the tip station. That way, they arrive at the frog with their bow thumb already bent and bow knuckles flat but relaxed.
Advanced string changes: More advanced players can use their bow fingers and hand to precipitate string crossings. At the frog, students can pivot their fingers to change their bow to an adjacent string. In the middle of the bow, students can use their bow thumb to tip the fingers slightly above the wrist to change to a lower string. These more advanced ways are usually only used for one or two quick notes on an adjacent string. It sometimes isn’t worth moving the entire arm for these string changes, just to move it right back a millisecond later!
I developed my “Posture Basics Tree” based on inspiration from the world around me. Looking outside of my studio has helped me generate metaphors that resonate with me and my students. And thinking about the commonalities between all of my students to distill teaching points into a single chart has helped me prioritize specific skills that are more fundamental to students’ playing. I would encourage all Suzuki teachers to look both around and inward at what their “Posture Basics Tree” would look like. Coming up with a design tailor-made for your studio will give you great insight and improve the quality of your teaching.
[box]
It’s hard to fathom, but this is my 50th article published in the American Suzuki Journal. A milestone like this is a reminder to look back and reflect. I hope that at least a few of you have found my articles helpful. In writing, my goal is to stimulate self-reflection on how to serve our students better. Dr. Suzuki was always looking for new ideas and better ways to teach. I am trying to do the same. It has been a pleasure to share my thoughts with you over the years. I am also very proud my 50th published article coincides with the 50th Anniversary issue of the ASJ. The plethora of articles published over those 50 years has been invaluable to me. I was inspired to write by two of the early contributors to the ASJ, Joseph McSpadden and Milton Goldberg, and their linguistic presentation of salient content. Perhaps an article of mine might one day inspire the next generation of ASJ contributors.
[/box]
